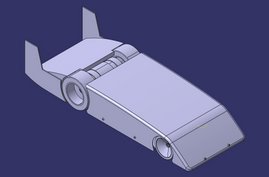
Pictures of the X2 progress in chronological order
Showing posts with label X2. Show all posts

Monday, June 1, 2009

X2 update-new batteries


Its been a while since I updated, but I've been moving into a new house. I'm just about all setup with my new workshop.

My old Thunder Power 4s 3300 mah 25c batteries were getting old and I needed to replace them. I just got in three brand new Thunder Power 3200 mah 4s 40c batteries. I will be able to use these 3 packs on the X3 and X5.

I will be testing in the next couple weeks and I'll post my updates as soon as I get some data.

Thursday, December 11, 2008

Video: X2 hits 97 mph


I tested the X2 on November 30th and had some really good luck with the car. I limited the center shock travel so the motor plate wouldn't scrape the ground. I managed 97 mph on 8s. Everything went well except the very high winds we encountered that day. You will notice in the video that I was driving the X2 in the opposite direction that its usually run. The wind was either a cross wind or a head wind. I think the wind had something to do with the speeds that day.

I was doing a couple test passes when I did the 97 mph pass. Unfortunately the video equipment didn't catch the 97 mph run. Once the equipment was running, I did some more passes but could not get another 97 mph run. The next 4-5 passes were all at about 91-92 mph.

I am planning to test this weekend weather permitting. I am going to step up to 12s. I am also going to reduce the upsweep of the rear end of the body to reduce some downforce and drag. I am hoping for some triple digits. The layout of the car is similar to what I ran at Rockingham on 12s:

Wednesday, November 12, 2008

X2 testing - 89 mph

X2 ready to go with some extra lexan added to the front for more downforce.

Bottom of the front end. The X2 was getting so much extra front end downforce, it was scraping against the concrete during hard braking.


I had great success using this clear lexan body at the ISC event at Rockingham. I hit 86 mph running the X2 front wheel drive before I blew a tire. I figured that If I can get some more downforce on the front end I could reach higher speeds before the tires blow. I cut a piece of lexan to extend over the front of the car by about an inch and the sides about an inch. This increased the front area and therefore increased the downforce. I was happy with the results. I hit 89 mph and the car felt nice and stable. I need considerably more run up room for the front wheel drive X2 than I do for the 4wd drive X5 and X3. The only problems I ran into was the bottom of the front end scraping the ground and wearing away the screws used for the motor mounts. For the next outing, I'm going to modify the suspension so the motor mount plate will stay level to the ground and not scrape the ground. I'm shooting for 100mph for the next testing session.

Thursday, August 14, 2008

X2 Testing (8-3-08). Another blowout.

First set of tires tested


Tires worn down to their minimum diameter after only 5 runs

Second set of tires exploded at 72 mph


Tire carnage all over the track


Click on video above then click on "watch in high quality"

In this testing session I tried 2 sets of tires. The first set of tires had foam cut from a large piece of stock foam. Then I glued the foam onto the custom aluminum rims that my father machined. Then I trued down the diameter of the foam from 4.5 inch to 3.5 inches. The second set of tires are based on the stock foam tires that come in the OFNA Ultra GTP kit. The only thing I did was true down the diameter from 4 inches to 3.5 inches. Then I modified the center of the rim to accept the 1/10th scale clamp style hub.

I first tested the aluminum tires. I ran these tires for about 5 passes. After each pass I would check the diameter of the tire. It was apparent that the foam I used for the aluminum rims was wearing out very fast. Sunny said that as the X2 passed by, he could see tire dust billowing from the sides of the car. Within 5 runs the tire diameter went from 3.5" to about 3.25". The minimum diameter I can run is about 3.25" before the chassis starts to hit the ground. These tires worked very well and held together for a pass with a max speed of about 70 mph. The problem that I am seeing is that on that 70 mph pass, I was using 100% throttle. With 30 V at a KV of 480 that is an rpm of 14440. That should be a speed of 110mph. There is obviously serious wheel spin.

The second set started out very well. But after I made more passes and increasing throttle, the tires exploded. The same thing happened as with the first set, I was giving the X2 full throttle and the tires were spinning at a much higher rate than what the car was traveling.

It looks like I am going to put the X2 on standby for now. I am going to concentrate on the X3 for the International Speed Competition in October. I am working on getting a 12s battery setup. The X3 has been performing very well and I am going to be shooting for 100mph on the 12s setup. Check back for details on the X3.

Sunday, July 27, 2008

X2 is back


I have been working on some changes for the X2 while I have been testing the X3. This past Saturday, I tested some new wheels. These wheels were taken from the OFNA Ultra GTP and I modified them to accept 1/10 scale clamping hubs. Then I trued the tires down to 3.5" in diameter from 4".

Here are some videos of the X2 doing some low speed passes from this Saturdays testing:


Some people have mentioned to me the reason why I have been blowing up tires is from all the sprung weight of the motor within the suspension. I do agree with this. But I have to wonder if the problem is still the design of the car, or a problem with the tires. If you take a look at Nic Case's prototype from last year, you can see that neither the front end or rear end has suspension:


Nic was supposedly able to reach 130mph with this car and his wheels are half the diameter of my tires. So it seems like the tires aren't the limiting factor in these high speed r/c cars. I will still be working on the X2 as my main car for the high speed event, but the X3 will be a backup. I will be doing some more testing with different tires and I will post my progress here.

Thursday, December 27, 2007

New wheels installed, "X2" ready for high speed testing

"X2" with new wheels installed

These new wheels are now the correct diameter and trued for high speed running.

New wheel on the left, old wheel on the right. You can see there is much less sidewall of foam. Hopefully this will reduce the likelihood that the foam will fly off the rim. The new aluminum wheels are much heavier than the plastic ones, but they are much stronger.

Data from a slow speed test using new wheels. High speed for this run about 28 mph.

Weight of "X2" with all electronics installed except for the body, 6 lbs 8 oz.

Tuesday, December 11, 2007

More wheel designs

All wheel designs to be tested in the next high speed run.

On the left is the 1/8 scale on road based wheel and on the right is a much larger OFNA style on road wheel. The OFNA based wheel has a much larger inside diameter and outside diameter. The idea with the OFNA based wheel is to minimize the sidewall size of the wheel while keeping the outside diameter close to 3.25". The tire needs to be trued down to correct size. You can also see that a hub isn't used to attach the wheel to the motor shaft. Instead a mount using setscrews is used to tighten the wheel on the motor shaft.

Friday, November 16, 2007

Wing design

From my initial calculations, I need to get downforce on the front drive wheels in order to get enough traction to be able to accelerate at an acceptable rate. I am starting the wing design using a symmetric airfoil (NACA 0006). Ideally, I want to be able to create a significant amount of downforce at low speeds, then decrease downforce coefficient at higher speeds. I do not want to create too much downforce at high speeds. This will put unnecessary strain on the car and will increase drag significantly. The goal is to keep enough downforce on the drive wheels to create enough traction to get up to speed quickly. The idea is to have a flap that will start off at a large angle (60 degrees) then decrease angle as the speeds increase. This will lower the lift coefficient (downforce coefficient in my case), but maintain a certain downforce on the drive wheels throughout the speed range of the car.

This is a rough mock up of how the wing will be placed on the car. Because the wing is so close to the ground, ground effect will increase the wings effective downforce coefficient.

Profile view of the NACA 0006 airfoil showing different degrees of flap.

Series of pictures illustrating how the flap will decrease in angle as speed increases:

Tuesday, November 13, 2007

More wheels and transmitter modifications

Latest iteration of the "X2"
Wheels

Still working on more custom wheels. I want to try out a number of different wheels to see which ones will work best. I already have two types that I want to try. Each wheel has a different foam thickness.

Wheel being measured for roundness.

Transmitter

I had just about given up on my 3PM transmitter until I found out that increasing the range on my Futaba 3PM 2.4 ghz transmitter isn't very difficult. There are a couple of off the shelf components that I found to increase range. Since 2.4 ghz is widely used in wireless internet, there are many places that sell components such as pig tails and amplifiers. I was able to open up my 3PM and see what kind of connectors were used for the antenna. Then I was able to find a 500mW amplifier to significantly increase my range. This is what the transmitter looks like with the modification:

Futaba 3PM 2.4 Ghz modified to increase range. Range of the stock transmitter is a measly 300ft. With this 500mW amp I have increased the range by about 3x.

Parts used:

Pig-Tail (U.FL to RP-SMA):

500mW Amplifier (RP-SMA):
Gyro:

I included a gryo into my setup. I found out that after I corrected the steering, the car had become much more sensitive with steering input. I tried all the adjustments to minimize this and nothing seemed to work. A number of people have said a gyro helps significantly. This gyro is nice because I can use the third channel on my transmitter to increase or decrease the sensitivity of the gyro without stopping the car to adjust the gyro itself. I can adjust it remotely.

Matt Shumaker described how a gyro affected his car. He has noted that at low speeds the gryo helps significantly by keeping the car on a straight trajectory with much less steering input from the driver. But at high speeds, the gyro makes the car feel numb. This is especially true if the gyro is too slow to compensate for movements in the steering.

Futaba GY401 next to the right rear wheel in the "X2"
Front end displaying the Thunder Power batteries and Castle Creations HV-110 performing perfectly during all of my testing.

I am still working on a wing to create downforce. The tight spaces on my car limit where I can mount a wing. I am now sizing the wing and airfoil section to create the desired amount of downforce at a certain speed.

Tuesday, October 16, 2007

New wheels and more street testing

Last time out testing at the Houston Dragway, I had problems with my tires holding together at speeds from 60-70mph. I have been working with my father to make some custom aluminum wheels using 1/8 scale on road tires. The wheels I have been using so far are 1/10 scale nitro drag tires:
These tires are very very soft and they are the correct outside diameter (3.25") and width (1.5") for the X2. Since these tires weren't working, I had to go a different route. The 1/8 scale tires are approximately the correct outside diameter (about 75-80mm) but they are much harder foam. The only problem is they are very wide (3"). What I did was to make my own aluminum rims and remove the foam from a 1/8 scale rim. This way I could use the same method of mounting (1/10th scale clamping hub). This is what I started with:


I removed the foam from the 1/8 scale wheel and glued it onto the aluminum rim. Here's what the new wheel looks like (left) compared to the old one(right). The new wheel is much much stronger and should hold up to the extreme forces.

I also modified the front suspension. I moved the tie rods from up above the upper arms to very low to maintain correct front end geometry:

Data from the last street run. Link to the FDR file from my run on 10-11-07. You can view this after downloading and installing the Eagle tree software.

I have also updated my spreadsheet. I added the ability to choose a motor based on what Kv and Kt requirements are calculated. I also added a section where you can calculate the amount of downforce created by a wing added to the car. And based on the traction created by this wing, you can see at what speed your total traction will intersect with your traction needed to accelerate at your desired rate.


Here is the link to download the spreadsheet for use on your own calculations.

Graph showing traction available vs traction needed. The point where the two lines intersect is the speed at which enough downforce will be created to give you the traction to accelerate without spinning the wheels.

I am still working on the wing and how to attach it to my car. Once the wing is completed and attached, I want to get out to the Houston Dragway as soon as I can to do some more high speed testing.